> ## Documentation Index
> Fetch the complete documentation index at: https://help.finerd.ai/llms.txt
> Use this file to discover all available pages before exploring further.

# Record a refund

> Record a refund in finerd: refund a recorded expense, enter one without the purchase, fix a bank refund and see how refunds count in reports.

When a shop gives your money back, record a refund instead of a new income. finerd books it in the purchase's category, so your spending in that category goes down and your income doesn't change.

<h2 id="refund">
  Refund an expense you recorded
</h2>

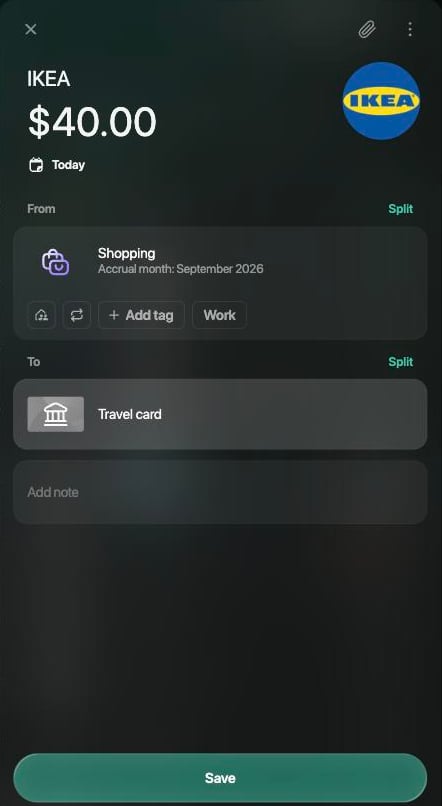
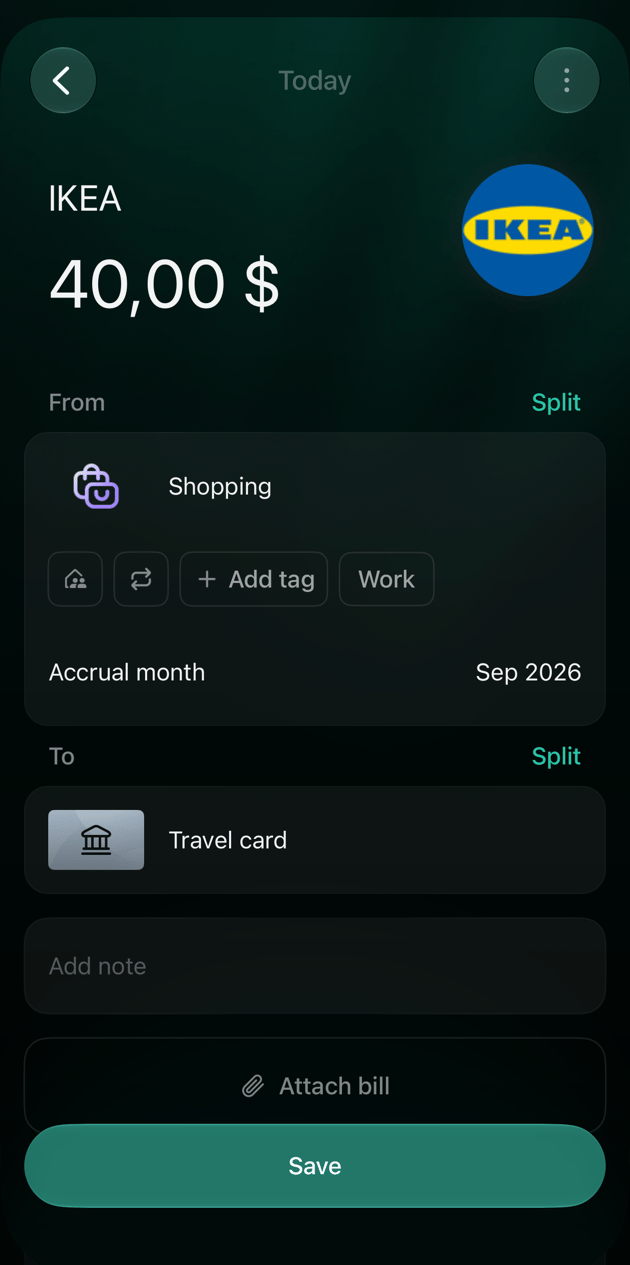
Choose the original expense, and finerd fills in the refund from it: the same merchant, category and account, the full amount and today's date. Check it and change what's different before you save; nothing is recorded until you select **Save**.

* Only part of the money came back: change the amount.
* The money came back to another account: change the account in **To**.
* A transfer can't be refunded: finerd shows **Validation error**. Choose the purchase itself.

The refund keeps the purchase's accrual month, which you can see under the category.

<Tabs>
  <Tab title="Web">
    1. On the **Dashboard** or the **Transactions** page, select **Add transaction**, then **Refund**.
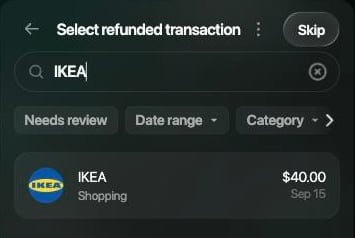
    2. On **Select refunded transaction**, find the purchase: type the merchant in **Search** or use the filters. Select the purchase.
    3. Check the amount, **From** (the purchase's category) and **To** (the account the money came back to). For a partial refund, select the amount and enter what came back.
    4. Select **Save**. finerd confirms with **Transaction created on** and the date.

    <div style={{ display: "grid", gridTemplateColumns: "repeat(auto-fit, minmax(min(100%, 240px), 1fr))", gap: "20px", alignItems: "start" }}>
      <Frame caption="Find the purchase that was refunded.">
        <img src="https://mintcdn.com/finerdai/By7zoKvit0UAH9r7/images/transactions/record-refund/web-refund-pick.png?fit=max&auto=format&n=By7zoKvit0UAH9r7&q=85&s=d3bc8e464d89c209e4b955f9e4f47ba1" alt="Select refunded transaction panel with IKEA typed in Search and one result: IKEA, Shopping, $40.00, Sep 15." width="355" height="238" data-path="images/transactions/record-refund/web-refund-pick.png" />
      </Frame>

      <Frame caption="finerd fills in the refund from the purchase.">
        <img src="https://mintcdn.com/finerdai/By7zoKvit0UAH9r7/images/transactions/record-refund/web-refund-editor.png?fit=max&auto=format&n=By7zoKvit0UAH9r7&q=85&s=28d27ea197c8a24c44ee44937fd75051" alt="New IKEA transaction of $40.00 dated Today, from Shopping with accrual month September 2026 to Travel card, with a Save button." width="442" height="806" data-path="images/transactions/record-refund/web-refund-editor.png" />
      </Frame>
    </div>
  </Tab>

  <Tab title="Android">
    The Android app doesn't have **Refund** yet. Record the refund on the web or in the iOS app.
  </Tab>

  <Tab title="iOS">
    1. On **Dashboard** or **Transactions**, tap **+**, then **Refund**.
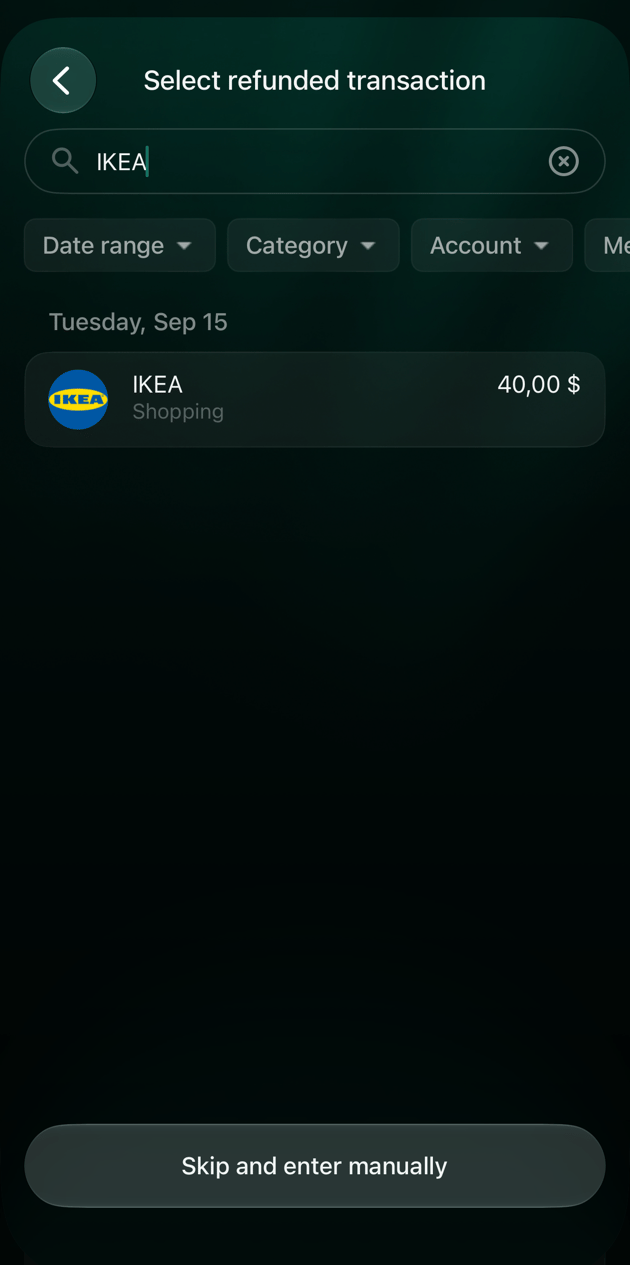
    2. On **Select refunded transaction**, tap the purchase. To find it faster, type the merchant in **Search**.
    3. Check the amount, **From** and **To**. For a partial refund, tap the amount, enter what came back and tap **Apply**.
    4. Tap **Save**.

    <div style={{ display: "grid", gridTemplateColumns: "repeat(auto-fit, minmax(min(100%, 240px), 1fr))", gap: "20px", alignItems: "start" }}>
      <Frame caption="Find the purchase that was refunded.">
        <img src="https://mintcdn.com/finerdai/By7zoKvit0UAH9r7/images/transactions/record-refund/ios-refund-pick.png?fit=max&auto=format&n=By7zoKvit0UAH9r7&q=85&s=fa9c9baaab782f532270db6a4b74187f" alt="iOS Select refunded transaction screen with IKEA searched: the purchase of 40 dollars on September 15, Shopping, and a Skip and enter manually button." width="630" height="1265" data-path="images/transactions/record-refund/ios-refund-pick.png" />
      </Frame>

      <Frame caption="finerd fills in the refund from the purchase.">
        <img src="https://mintcdn.com/finerdai/By7zoKvit0UAH9r7/images/transactions/record-refund/ios-refund-editor.png?fit=max&auto=format&n=By7zoKvit0UAH9r7&q=85&s=4633466d88f574053aada05261f5767b" alt="iOS new IKEA transaction of 40 dollars dated Today, from Shopping with accrual month Sep 2026 to Travel card, with a Save button." width="630" height="1265" data-path="images/transactions/record-refund/ios-refund-editor.png" />
      </Frame>
    </div>
  </Tab>
</Tabs>

The refund appears in **Transactions** under the merchant's name with a plus sign, for example **IKEA** **+\$40.00**, and the account's balance goes up by the amount.

<h2 id="manual">
  Record a refund without the original transaction
</h2>

If the purchase isn't in finerd, for example you didn't record it, enter the refund yourself. You give the amount and the merchant who refunded you; finerd takes the category and the account from that merchant's latest transaction. Nothing is recorded until you select **Save**.

Check both sides before you save:

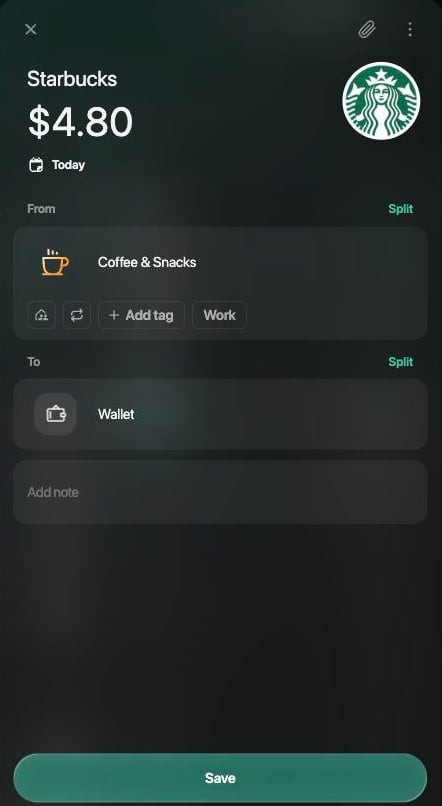
* **From** must be the category of the purchase. If it shows an income category, such as **Uncategorized Income**, or **Choose category**, select the purchase's category: otherwise the refund isn't counted against your spending.
* **To** must be the account the money came back to.

<Tabs>
  <Tab title="Web">
    1. On the **Dashboard** or the **Transactions** page, select **Add transaction**, then **Refund**.
    2. On **Select refunded transaction**, select **Skip**.
    3. On **Refund amount**, enter the amount, check the currency and select **Continue**.
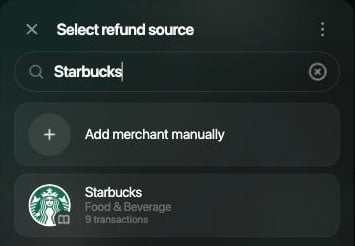
    4. On **Select refund source**, search for the merchant and select it. If it isn't found, select **Add merchant manually**.
    5. Check **From** and **To**, then select **Save**.

    <div style={{ display: "grid", gridTemplateColumns: "repeat(auto-fit, minmax(min(100%, 240px), 1fr))", gap: "20px", alignItems: "start" }}>
      <Frame caption="Choose who refunded you.">
        <img src="https://mintcdn.com/finerdai/By7zoKvit0UAH9r7/images/transactions/record-refund/web-manual-source.png?fit=max&auto=format&n=By7zoKvit0UAH9r7&q=85&s=7086e03f932d04732d28895516e050f9" alt="Select refund source panel with Starbucks typed in the search field: Add merchant manually and Starbucks, Food & Beverage, 9 transactions." width="355" height="246" data-path="images/transactions/record-refund/web-manual-source.png" />
      </Frame>

      <Frame caption="Check the category and the account before saving.">
        <img src="https://mintcdn.com/finerdai/By7zoKvit0UAH9r7/images/transactions/record-refund/web-manual-editor.png?fit=max&auto=format&n=By7zoKvit0UAH9r7&q=85&s=5d76f0490bce6383313d969d0830cb61" alt="New Starbucks transaction of $4.80 dated Today, from Coffee & Snacks to Wallet, with a Save button." width="442" height="806" data-path="images/transactions/record-refund/web-manual-editor.png" />
      </Frame>
    </div>
  </Tab>

  <Tab title="Android">
    The Android app doesn't have **Refund** yet. Record the refund on the web or in the iOS app.
  </Tab>

  <Tab title="iOS">
    1. On **Dashboard** or **Transactions**, tap **+**, then **Refund**.
    2. Tap **Skip and enter manually**.
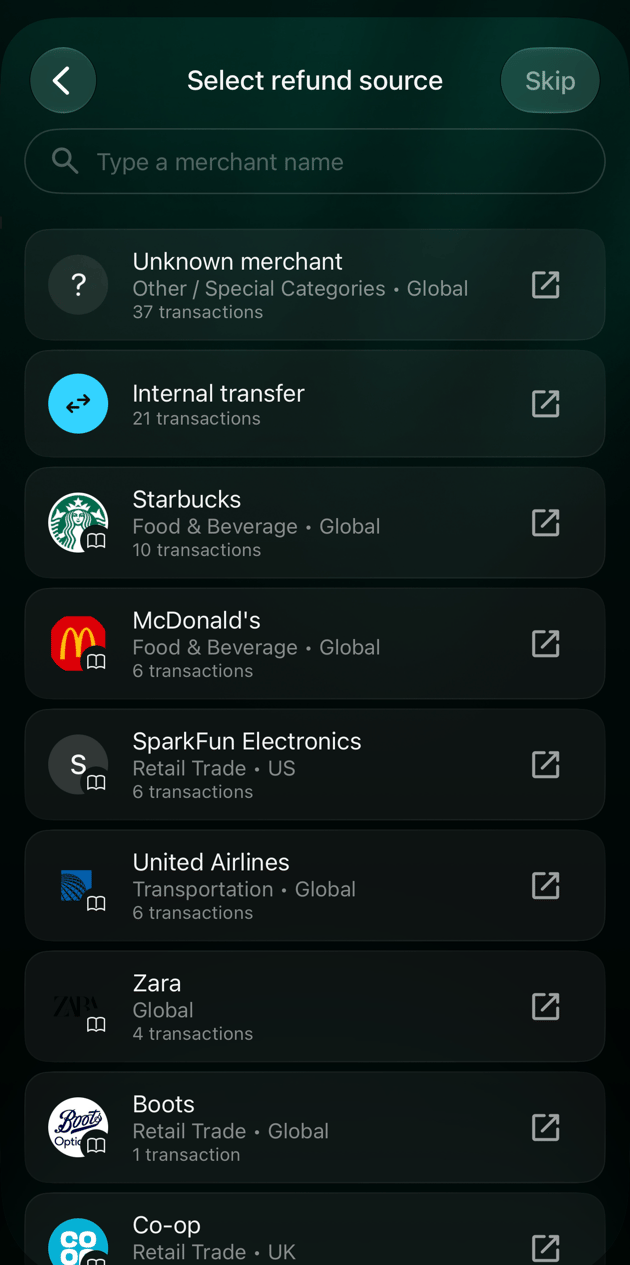
    3. On **Select refund source**, tap the merchant. To find it, type its name in the search field. If you don't know the merchant, tap **Skip**.
    4. On **Refund amount**, enter the amount, check the currency and tap **Continue**.
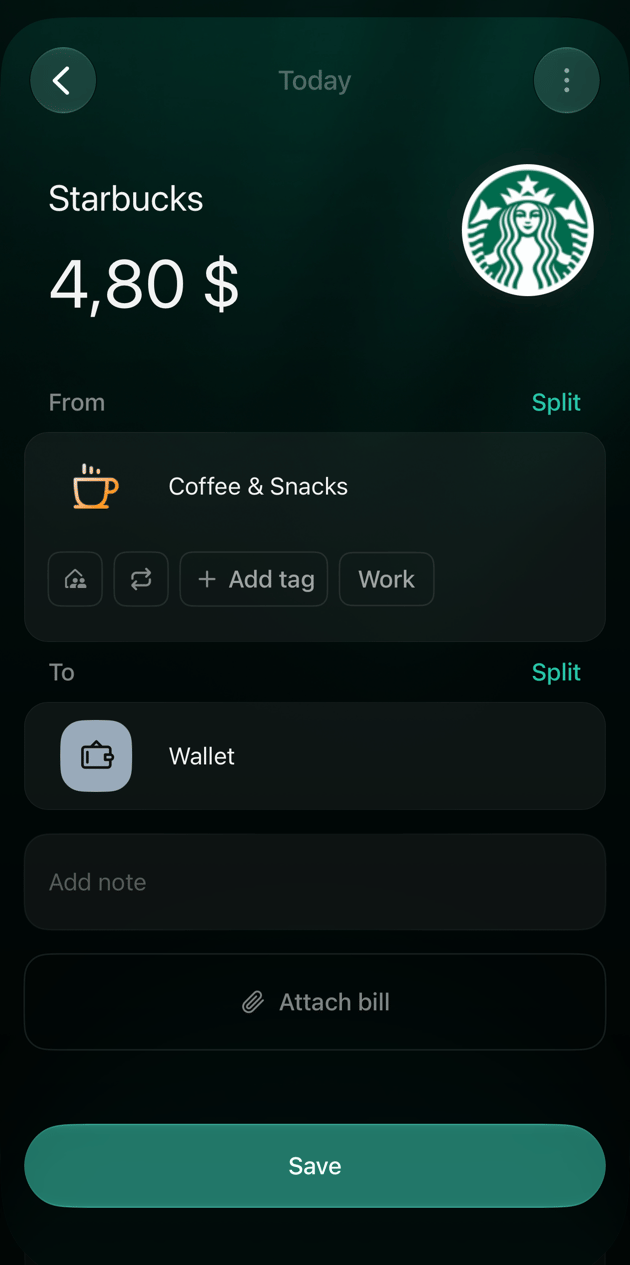
    5. Check **From** and **To**, then tap **Save**.

    <div style={{ display: "grid", gridTemplateColumns: "repeat(auto-fit, minmax(min(100%, 240px), 1fr))", gap: "20px", alignItems: "start" }}>
      <Frame caption="Choose who refunded you.">
        <img src="https://mintcdn.com/finerdai/By7zoKvit0UAH9r7/images/transactions/record-refund/ios-manual-source.png?fit=max&auto=format&n=By7zoKvit0UAH9r7&q=85&s=bd28740375742618674d06b51d8be0e9" alt="iOS Select refund source screen with a Skip button, a merchant search field and a list of merchants including Starbucks." width="630" height="1265" data-path="images/transactions/record-refund/ios-manual-source.png" />
      </Frame>

      <Frame caption="Check the category and the account before saving.">
        <img src="https://mintcdn.com/finerdai/By7zoKvit0UAH9r7/images/transactions/record-refund/ios-manual-editor.png?fit=max&auto=format&n=By7zoKvit0UAH9r7&q=85&s=59e54895c4b330045a06bbf8abe99bd9" alt="iOS new Starbucks transaction of 4.80 dollars dated Today, from Coffee & Snacks to Wallet, with a Save button." width="630" height="1265" data-path="images/transactions/record-refund/ios-manual-editor.png" />
      </Frame>
    </div>
  </Tab>
</Tabs>

The refund appears in **Transactions** like a refund of a recorded purchase, for example **Starbucks** **+\$4.80**.

<h2 id="bank-refund">
  When a refund comes from your bank
</h2>

If your bank is connected, the refund arrives on its own as money coming into your account. Don't record it again with **Refund**: fix the bank's transaction instead.

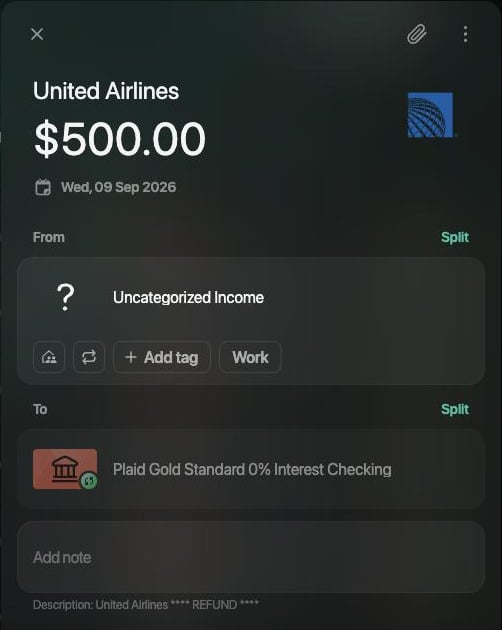
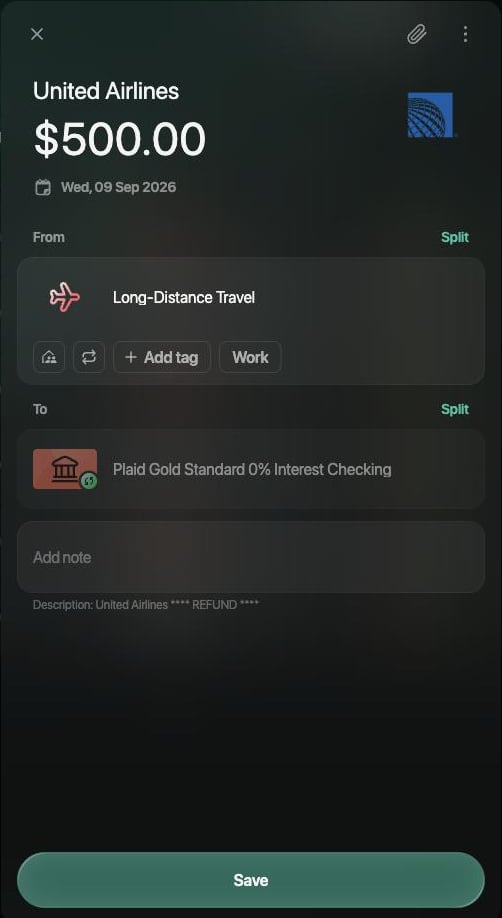
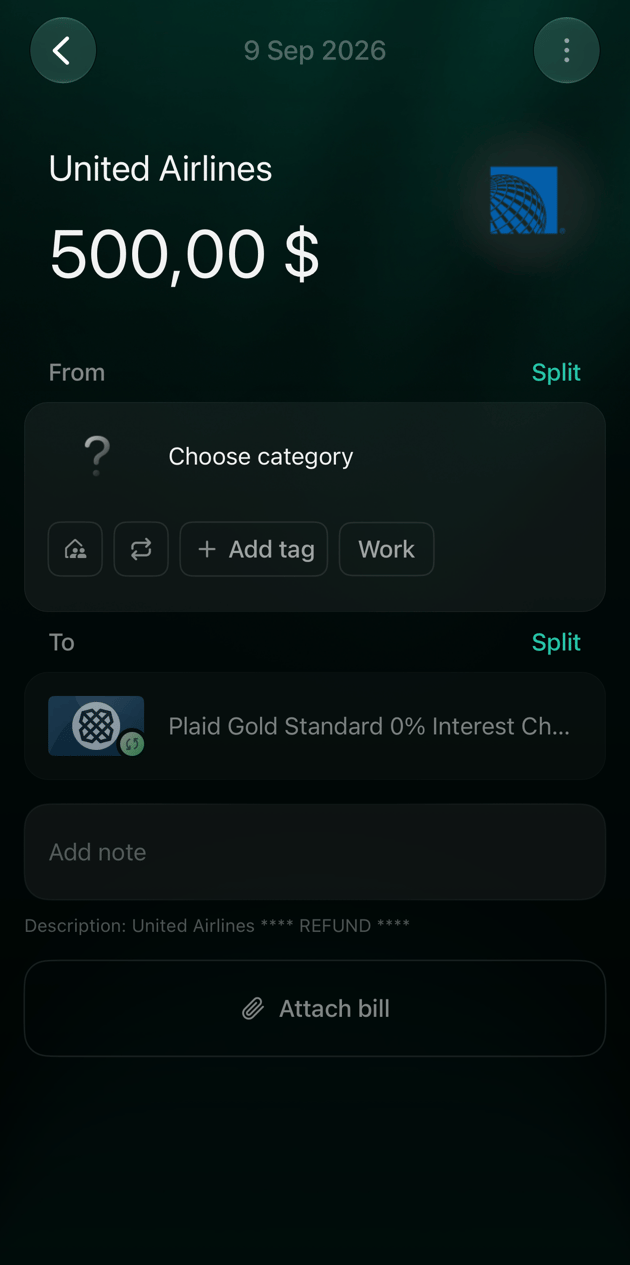
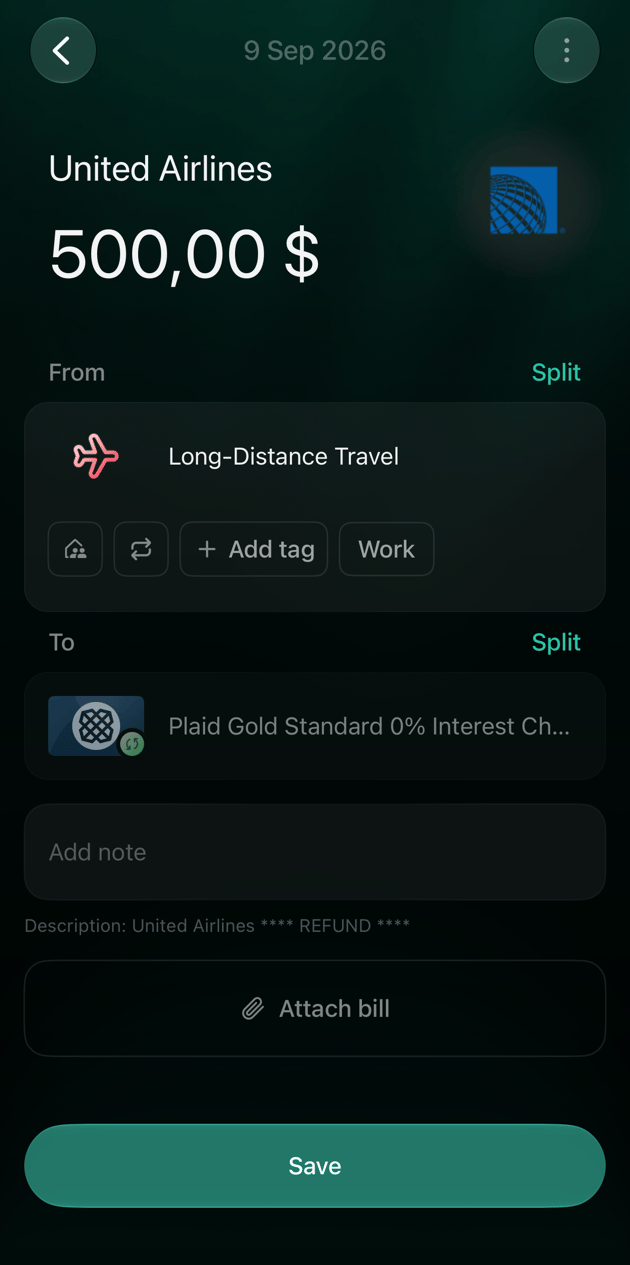
finerd doesn't link a bank refund to your purchase. Check its category: if it's an income category, such as **Uncategorized Income** (in the iOS app, **Choose category**), change **From** to the purchase's category, for example **Long-Distance Travel** for a cancelled flight. The refund then lowers your spending in that category instead of adding income. The bank's account, amount and date stay as they are.

<Tabs>
  <Tab title="Web">
    1. Open the refund in **Transactions**. To find it, type the merchant in **Search**.
    2. Select the category under **From**.
    3. In the list that opens, open **Expense categories** or type the category in **Search**, then select the purchase's category.
    4. Select **Save**.

    <div style={{ display: "grid", gridTemplateColumns: "repeat(auto-fit, minmax(min(100%, 240px), 1fr))", gap: "20px", alignItems: "start" }}>
      <Frame caption="A refund from the bank booked as income.">
        <img src="https://mintcdn.com/finerdai/By7zoKvit0UAH9r7/images/transactions/record-refund/web-bank-refund.png?fit=max&auto=format&n=By7zoKvit0UAH9r7&q=85&s=8eef81e0cd42d8c201a34341879a69e1" alt="United Airlines $500.00 on Wed, 09 Sep 2026, from Uncategorized Income to the connected Plaid Gold Standard 0% Interest Checking account, description United Airlines REFUND." width="502" height="630" data-path="images/transactions/record-refund/web-bank-refund.png" />
      </Frame>

      <Frame caption="The purchase's category in From, ready to save.">
        <img src="https://mintcdn.com/finerdai/By7zoKvit0UAH9r7/images/transactions/record-refund/web-bank-refund-fixed.png?fit=max&auto=format&n=By7zoKvit0UAH9r7&q=85&s=20150eb3c238b8de4a100761c2283d2d" alt="The same United Airlines transaction with Long-Distance Travel in From and a Save button." width="502" height="918" data-path="images/transactions/record-refund/web-bank-refund-fixed.png" />
      </Frame>
    </div>
  </Tab>

  <Tab title="Android">
    1. Open the refund in **Transactions**.
    2. Tap the category under **From**.
    3. Under **Expense categories**, tap the purchase's category.
    4. Tap **Save**.
  </Tab>

  <Tab title="iOS">
    1. Open the refund in **Transactions**.
    2. Under **From**, tap **Choose category** or the category shown.
    3. Tap **Categories** or type the category in **Search**, then tap the purchase's category.
    4. Tap **Save**.

    <div style={{ display: "grid", gridTemplateColumns: "repeat(auto-fit, minmax(min(100%, 240px), 1fr))", gap: "20px", alignItems: "start" }}>
      <Frame caption="A refund from the bank without an expense category.">
        <img src="https://mintcdn.com/finerdai/By7zoKvit0UAH9r7/images/transactions/record-refund/ios-bank-refund.png?fit=max&auto=format&n=By7zoKvit0UAH9r7&q=85&s=83d66cacf125db9b2c5fd8075e388bd1" alt="iOS United Airlines 500 dollars on 9 Sep 2026 with Choose category in From and the Plaid Gold account in To." width="630" height="1265" data-path="images/transactions/record-refund/ios-bank-refund.png" />
      </Frame>

      <Frame caption="The purchase's category in From, ready to save.">
        <img src="https://mintcdn.com/finerdai/By7zoKvit0UAH9r7/images/transactions/record-refund/ios-bank-refund-fixed.png?fit=max&auto=format&n=By7zoKvit0UAH9r7&q=85&s=94cfb2236c2f59d42af1f50d29406f93" alt="iOS United Airlines transaction with Long-Distance Travel in From and a Save button." width="630" height="1265" data-path="images/transactions/record-refund/ios-bank-refund-fixed.png" />
      </Frame>
    </div>
  </Tab>
</Tabs>

<h2 id="check">
  How a refund is counted
</h2>

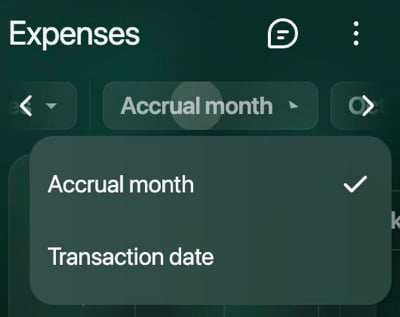
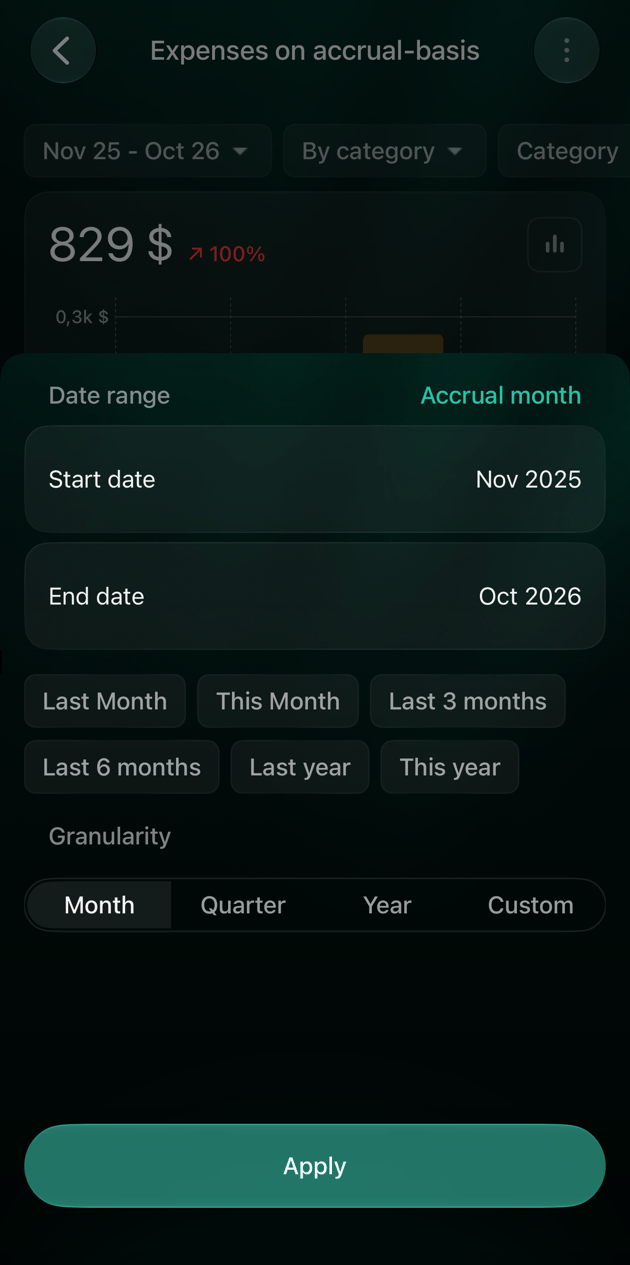
A refund lowers your spending in its category; it isn't counted as income. Which month it lowers depends on the date setting of the [**Expenses** report](/reports/customize-report#date-basis):

| Report setting | Where the refund counts | Example: \$40 paid on Sep 15, refunded on Oct 5 |
| - | - | - |
| **Accrual month** (the default) | In the purchase's month: the refund keeps its accrual month | September's spending in the category drops by \$40; October doesn't change |
| **Transaction date** | In the month you record the refund | September keeps the $40; October drops by $40 and can show a negative amount |

A refund you enter without the purchase counts in the month you record it.

finerd doesn't link a refund to the purchase and doesn't stop you from refunding the same purchase twice. If a refund is in your records twice, for example you recorded it and the bank sent it too, [delete your own copy](/transactions/add-transaction#delete).

To switch the report between the two settings:

<Tabs>
  <Tab title="Web">
    Open **Reports** → **Expenses**, select **Accrual month** at the top and choose **Transaction date**. Choose **Accrual month** to switch back.
    <Frame caption="The report's date setting.">
      <img src="https://mintcdn.com/finerdai/By7zoKvit0UAH9r7/images/transactions/record-refund/web-report-basis.png?fit=max&auto=format&n=By7zoKvit0UAH9r7&q=85&s=e0dabd8cfbaeb331a545f6d7f8f0b8e6" alt="Expenses report with the Accrual month menu open: Accrual month, checked, and Transaction date." width="400" data-path="images/transactions/record-refund/web-report-basis.png" />
    </Frame>
  </Tab>

  <Tab title="Android">
    Open **Reports** → **Expenses**, tap the period at the top, then choose **By transaction date** or **By accrual month** in the period's menu.
  </Tab>

  <Tab title="iOS">
    Open **Reports** → **Expenses** and tap the period at the top. Tap **Accrual month** to switch it to **Transaction date**, then tap **Apply**.
    <Frame caption="The date setting is at the top right of the period.">
      <img src="https://mintcdn.com/finerdai/By7zoKvit0UAH9r7/images/transactions/record-refund/ios-report-basis.png?fit=max&auto=format&n=By7zoKvit0UAH9r7&q=85&s=28b1fa372c768d005f3a229a66a450c0" alt="iOS Expenses on accrual-basis report with the period panel open: Date range, Accrual month, start and end dates, presets and an Apply button." width="345" data-path="images/transactions/record-refund/ios-report-basis.png" />
    </Frame>
  </Tab>
</Tabs>


This documentation is built and hosted on [Mintlify](https://mintlify.com), a developer documentation platform.